发布于 

NextJs

B站Up:全栈码叔

源教程地址

什么是NextJS

NextJs Doc
中文文档

NextJs基于React,
reactjs框架的功能比较单一,
主要是将html和javascript两者结合使用,
NextJs在此之外引入额外的框架功能:

  • CLI/运行时/文件结构
  • 路由
  • 静态生成器static generation
  • ISR
  • SSR
  • API
  • Style
  • Vercel静态托管平台

还有另外2个和NextJs比较相似的框架:

  • GatsbyJs:生成静态页面,数据从本机抓取数据整合,通过GraphQL查询服务提供数据
  • NestJS:更加偏向后端,继承了Controller、Service等层级,偏向MVC结构

NextJs框架目录

创建项目:

1
npx create-next-app@latest
package.json脚本命令
  • dev 开发模式启动
  • build 构建生产环境应用
  • start 启动生产环境服务器
  • export 构建静态网站站点

原本的next export命令用于构建静态网站站点,
现在需要直接在next.config.mjs中配置output:

1
2
3
4
const nextConfig = {
output:'export',
};
export default nextConfig;

这样,在运行npm run build的时候,就会自动生成out目录,下面存放的就是静态资源

.next文件

.next文件是next项目生产环境下运行的文件,
在dev模式下也生成.next文件

静态路由

index路由

在文件根目录下创建pages文件,
在pages文件下创建的子文件可以通过路由进行导航:

  • pages
    • about
      • index.tsx

访问方式:localhost:3000/about

嵌套路由
  • pages
    • news
      • hot.tsx

访问方式:localhost:3000/news/hot

动态路由

动态路由

动态路由使用方括号包裹参数

  • pages
    • news
      • [newId].tsx

在访问路径的时候加入路由:localhost:3000/news/1

通过useRouter路由钩子获取到路由参数:

1
2
const router = useRouter();
const id = router.query.newId
动态父级路径

作为路径的目录名也可以用动态参数的方式命名,
表示父级路径

  • pages
    • news
      • [newsId]
        • index.tsx
        • comment.tsx(访问目标)

在访问路径的时候加入路由:localhost:3000/news/1/comment

动态嵌套路由

路由中不仅仅可以嵌入1个动态参数,可以嵌入多个

  • pages
    • news
      • [newsId]
        • index.tsx
        • comment
          • index.tsx
          • [commentId].tsx(访问目标)

在访问路径的时候加入路由:localhost:3000/news/1/comment/1

动态params路由

动态参数还能包含更多信息:

  • pages
    • about
      • […params].tsx

访问路径:localhost:3000/about/1/2/3

参数获取方式(数组格式返回):

1
2
const router = useRouter();
const params = router.query.params // [1,2,3]

运行时动态获取数据

模拟后台接口获取数据

1
2
3
4
5
6
7
8
9
10
11
12
13
14
15
16
17
18
19
20
21
22
23
export default function Recipe() {
const [data, setData] = useState<any[]>([])
// 抓取数据
const fetchData = () => {
fetch('https://dummyjson.com/recipes')
.then(res=>res.json())
.then(reply=>{
console.log(reply)
setData(reply.recipes)
})
}
useEffect(()=>{
fetchData()
},[])
return (
<main>
<ul >
{data.map(item=><li key={item.id}>{item.name}</li>)}
</ul>
</main>
)
}

构建时获取数据预生成静态页面(SSG)

页面预构建 SSG
SSR和CSR的区别:

html诞生之时,就是作为一种从服务器端获取的资源(SSR),
但是随着html对灵活性的需求变得越来越大,

越来越多的交互逻辑都被放在了浏览器端执行,于是就衍生出了CSR的模式,

类似于一家餐厅(服务器)贩卖招牌菜(网页),
一开始外卖员(浏览器)来领餐,厨师把菜老老实实做好交到外卖员手里(SSR)
后来发现外卖员的料理水平甚至比厨师还强(浏览器专门负责js的运行和渲染),
于是厨师干脆就只把料理的食材和食谱(js/html/css等其它原料)交给外卖员,叫它现场制作就行了

SSR和SSG的区别
  • SSR:服务器端渲染,动态生成html文件返回给用户
  • SSG:服务器端构建,提前生成静态html文件,用户请求时返回
爬虫和SEO

由于SSR模式下的html文件都是由服务器端生成返回的,
爬虫就能直接爬取到其内容中的信息,
在SEO优化方面也有更大的优势,
这是CSR应用不具有的优势,

CSR类似于美食记者(爬虫)
想要来这家餐厅用招牌菜(网页)取材, 却只收到食材和一张食谱,
完全不知道成品是什么样子

服务器端渲染页面,需要在页面中多添加2个异步方法:

  • getStaticPaths
    • 用于动态路由页面中,判断哪些路由需要进行与渲染
  • getStaticProps
    • 请求预渲染参数props
    • 使用props渲染组件,生成html页面
getStaticProps

页面组件接收一个采纳数props,
而这个参数由getStaticProps传入

1
2
3
4
5
6
7
8
9
10
11
12
export default function Recipe(props:any) {
// dev模式下,在服务端运行一遍,在客户端运行一遍
console.log("Recipe", props.data)
return (
<main>
<ul >
{props.data.map((item:any)=>
<li key={item.id}>{item.name}</li>)}
</ul>
</main>
)
}

在getStaticProps中获取动态数据,传入组件内,调用组件函数进行渲染:

1
2
3
4
5
6
7
8
9
10
11
export async function getStaticProps(){
// 在服务器端运行
console.log("static props")
const response = await fetch('https://dummyjson.com/recipes')
const reply = await response.json()
return ({
props:{
data:reply.recipes,
}
})
}
getStaticPaths

对于动态路由页面,无法直接在getStaticProps函数中,通过useRouter直接获取到路由参数,
因此需要用getStaticPaths,定义静态页面生成的范围,
并将路由参信息通过context传入getStaticProps中:
getStaticPaths → getStaticProps → CompFunction

getStaticPaths:

1
2
3
4
5
6
7
8
9
export async function getStaticPaths(){
return {
paths:[
{params:{recipeId:'1'}},
{params:{recipeId:'2'}},
],
fallback:true, // fallback设置路由参数未匹配上之后的行为
}
}

getStaticProps:

1
2
3
4
5
6
7
8
9
10
11
12
13
14
// getStaticProps函数名称固定
export async function getStaticProps(context:any){
// 通过getStaticPaths获取到的路由参数
const recipeId = context.params.recipeId
const response = await fetch(`https://dummyjson.com/recipes/${recipeId}`)
const reply = await response.json()
console.log(reply)
return {
props:{
data:reply
}
}
}

构建结果
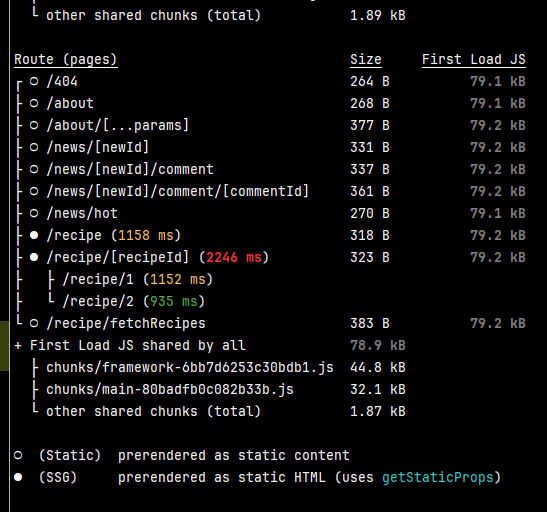
next build 构建结果
next build 构建结果
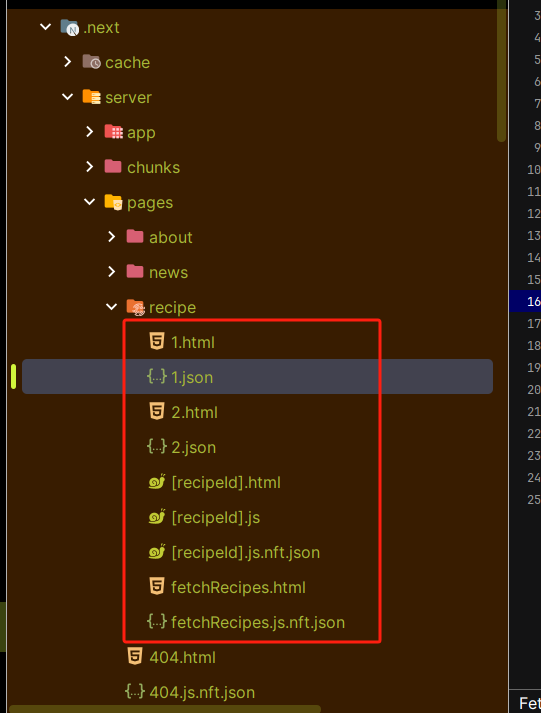
构建生成文件
构建生成文件

路由跳转 && 数据预取

路由跳转
  • Link
  • useRouter
1
2
3
4
5
6
7
8
9
10
11
export default function RouterButton(){
const router = useRouter()
return (
<div>
<Link href='/Home'>Home</Link>
<button onClick={()=>router.back()}>Back</button>
<button onClick={()=>router.push('/login')}>Login</button>
</div>
)
}

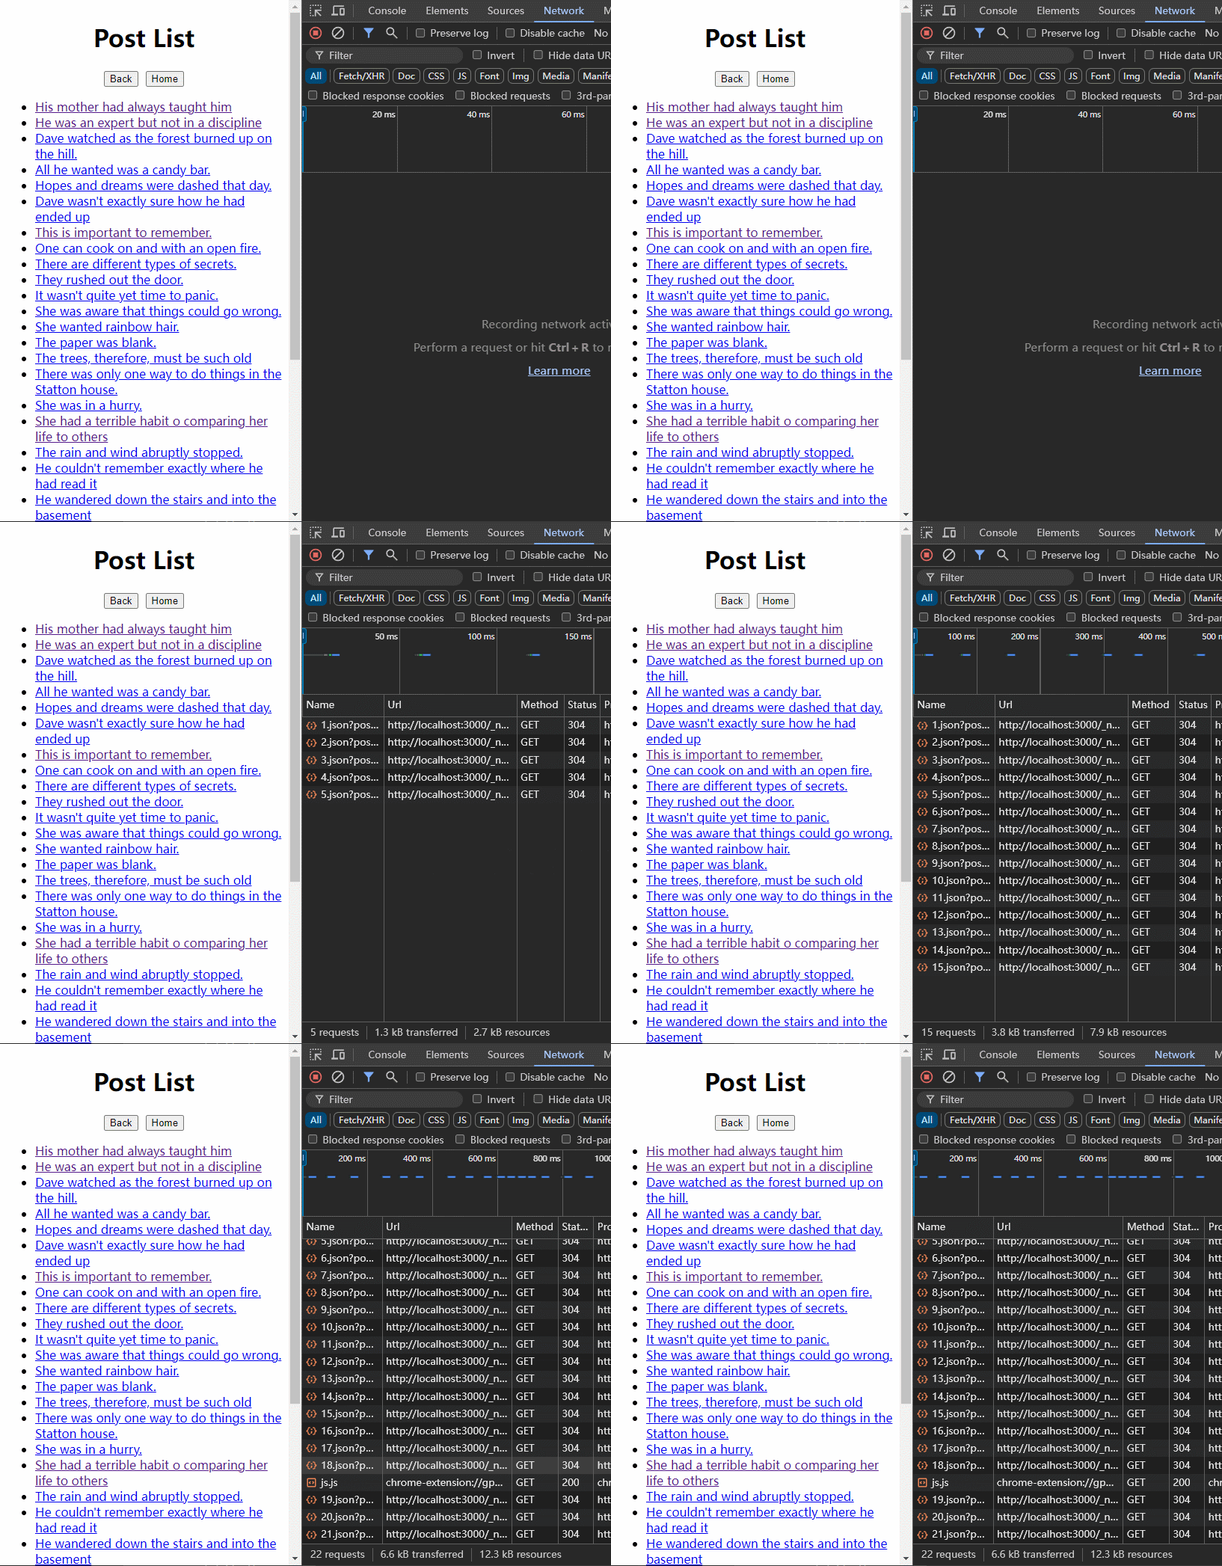
prefetch

Link

next提供的Link标签,提供prefetch标签,
即预获取目标页面,
即根据当前页面中的链接预获取数据,
可以根据视口滚动/鼠标悬停触发

客户请求时按需生成静态页面

服务端按需生成 SSG

动态路由可以进行全量构建:

1
2
3
4
5
6
7
8
9
10
11
export async function getStaticPaths(){
// 动态生成url参数
const response = await fetch("https://dummyjson.com/posts")
const reply = await response.json()
return {
paths:reply.posts.map((post:any)=>({
params:{postId:post.id.toString()}
})),
fallback: true,
}
}

也可以按需生成,配置getStaticPaths返回fallback为true:

1
2
3
4
5
6
export async function getStaticPaths(){
return {
paths:[],
fallback: true,
}
}

fallback可以有几个值:

  • block 访问未生成静态页面的动态路由时,返回404
  • true 按需生成静态页面

增量更新内容静态生成页面

revalidate

getStaticProps返回的revalidate,
用于控制静态页面刷新周期,

1
2
3
4
5
6
7
8
9
10
11
12
export async function getStaticProps(){
const dt = new Date().toString()
const response = await fetch('https://dummyjson.com/posts')
const reply = await response.json()
return {
props:{
data:reply.posts,
dt
},
revalidate:30 // 静态页面缓存周期
}
}

设置revalidate之后,静态文件的html请求头中就会多出一个参数,
代表缓存时长控制

1
cache-control: s-maxage=30, stale-while-revalidate

服务端渲染 SSR

SSR

Next中在组件内使用异步方法getServerSideProps,来表示需要服务器端渲染的页面
和getStaticProps的不同之处在于,
getServerSideProps的router参数context更类似http请求头的格式,
包括req、res、params、query等参数,
并且可以对res进行自定义响应头配置:

1
2
3
4
5
6
7
8
9
10
11
export async function getServerSideProps(context:any) {
const {res, query, params} = context
// 对静态页面的请求头自定义配置
res.setHeader('Set-Cookie', 'token=xxxxxxx')
return ({
props: {
data: [],
dt
}
})
}
路由传参

和SSG不同,SSR支持通过路由传入任何参数,
传参的方式可以是通过路由传入参数,也可以是通过动态路由传参,
无论是哪一种,在getServerSideProps中都可以通过context获取到

路由参数传参

路由文件: products.tsx
url:/products?type=phone&&brand=vivo

获取到的参数context.query:

1
{ type: 'phone', brand: 'vivo' }
动态路由传参

双方括号,表示就算不传params,也会映射到该文件中

路由文件:[[…params]].tsx
url:/products/phone/vivo
获取到的参数context.query:

1
{ params: [ 'phone', 'vivo' ] }

创建后端API接口

API

在pages下创建api目录,下面存放路由映射接口,

/pages/api

api目录下创建接口路径:api/products.ts

1
2
3
4
5
6
7
8
9
10
11
12
13
14
15
16
17
18
19
20
21
import {NextApiRequest, NextApiResponse} from "next";

type Data = {
dt: string,
products: any[]
}

// handler中配置返回值
export default async function handler(
req: NextApiRequest,
res: NextApiResponse<Data>
){
const dt = new Date().toString()
// console.log({dt, method: req.method, query: req.query})
const response = await fetch('https://dummyjson.com/products')
const reply = await response.json()
res.status(200).json({
dt,
products:reply.products
})
}
增删改查

handler中,根据字段req.method对请求类型进行判断:

1
2
3
4
5
6
7
8
9
10
11
12
13
14
15
16
17
18
19
20
21
22
23
24
25
26
27
28
export default async function handler(
req: NextApiRequest,
res: NextApiResponse<Data>
){
const dt = new Date().toString()
console.log({dt, method: req.method, query: req.query})
switch(req.method){
case "POST":
productsList.push(req.body)
break;
case "PUT":
{
const index = productsList.findIndex((product:any)=>product.id==req.body.id)
if(index>=0) productsList.splice(index, 1, req.body)
}
break;
case "DELETE":
const index = productsList.findIndex((product:any)=>product.id==req.body.id)
if(index>=0) productsList.splice(index, 1)
break;
default:
break;
}
res.status(200).json({
total: productsList.length,
products: productsList
})
}

页面全局页面布局设置

pages && layouts

Next.js v13推出了App Router作为新的路由解决方案:

1
2
3
4
5
6
7
8
- app
- template.tsx
- layout.tsx
- page.tsx
- news
- template.tsx
- layout.tsx
- page.tsx

其中template和layout都提供了公共的布局方法,
不同点在于:

  • layout,相当于多个子页面共享一个父布局
  • template,相当于为多个子页面创建相同的布局
页面辅助信息设置

在page或者layout中设置metadata变量,作为对header头的补充或者覆盖设置,
常用来优化SEO搜索引擎

1
2
3
4
5
6
7
8
9
import { Metadata } from 'next'

export const metadata: Metadata = {
title: 'Next.js',
}

export default function Page() {
return '...'
}
use client

Next默认app下的所有pages都是由服务器端渲染的,因此一些React的Hook无法使用,
需要在页面的第一行加上注释:

1
"use client"

发布到第三方托管平台

部署
Vercel

将静态文件托管在Vercel平台的方法虽然很简单,
但是国内基本是无法访问到Vercle托管的站点的

官网部署指导

部署问题

报错:服务端无法调用客户端api
1
ReferenceError: document is not defined
解决方法
  • 页面使用dynamic/ssr引入组件
    • 动态引入组件,可以根据ssr的配置判断是否在服务器端引入
  • 组件使用use client声明为客户端组件
1
2
3
4
5
6
7
import dynamic from "next/dynamic"
const Component = dynamic(()=>import("./Component"),{ssr:false})
export function Page(){
return (
<><Component/></>
)
}
1
2
3
4
"use client"
export function Component(){
return (<div>子组件</div>)
}

NextJs开发文档

目录结构

Next.js Project Structure

API参考

函数Function

generateMetadata

参考文章:

next定义静态页面的metadata:

1
2
3
4
5
6
7
8
9
10
11
12
13
14
15
16
17
18
19
20
21
22
23
24
25
26
27
28
29
30
// metadata 头部元数据设置
export const metadata: Metadata = {
title: "Next Lab",
description: "Next + Three Lab",
};

// viewport 视口设置
export const viewport: Viewport = {
themeColor:'black',
width:"320.1",
initialScale:1,
minimumScale:1,
maximumScale:1,
userScalable:false,
}

export default function RootLayout({
children,
}: Readonly<{
children: React.ReactNode;
}>) {
return (
<html lang="en">
<meta name="theme-color" content="#000"/>
<body className={`${geistSans.variable} ${geistMono.variable}`}>
{children}
</body>
</html>
);
}