{ "uriTemplate":"weather://forecast/{city}/{daate}", "name":"weather-forecast", "title":"Weather Forecast", "description":"Get weather forecast for any city and date", "mimeType":"application/json" }
协议操作
resources/list
resources/templates/list
resources/read
resources/subscribe 监控资源变化
用户交互模型
资源管理器可视化
AI智能建议
用户手动限制资源范围
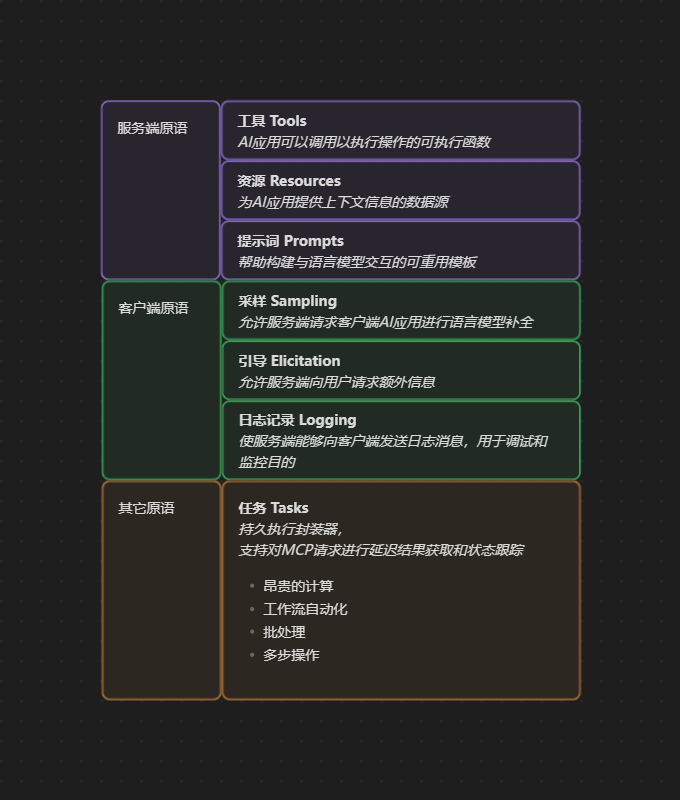
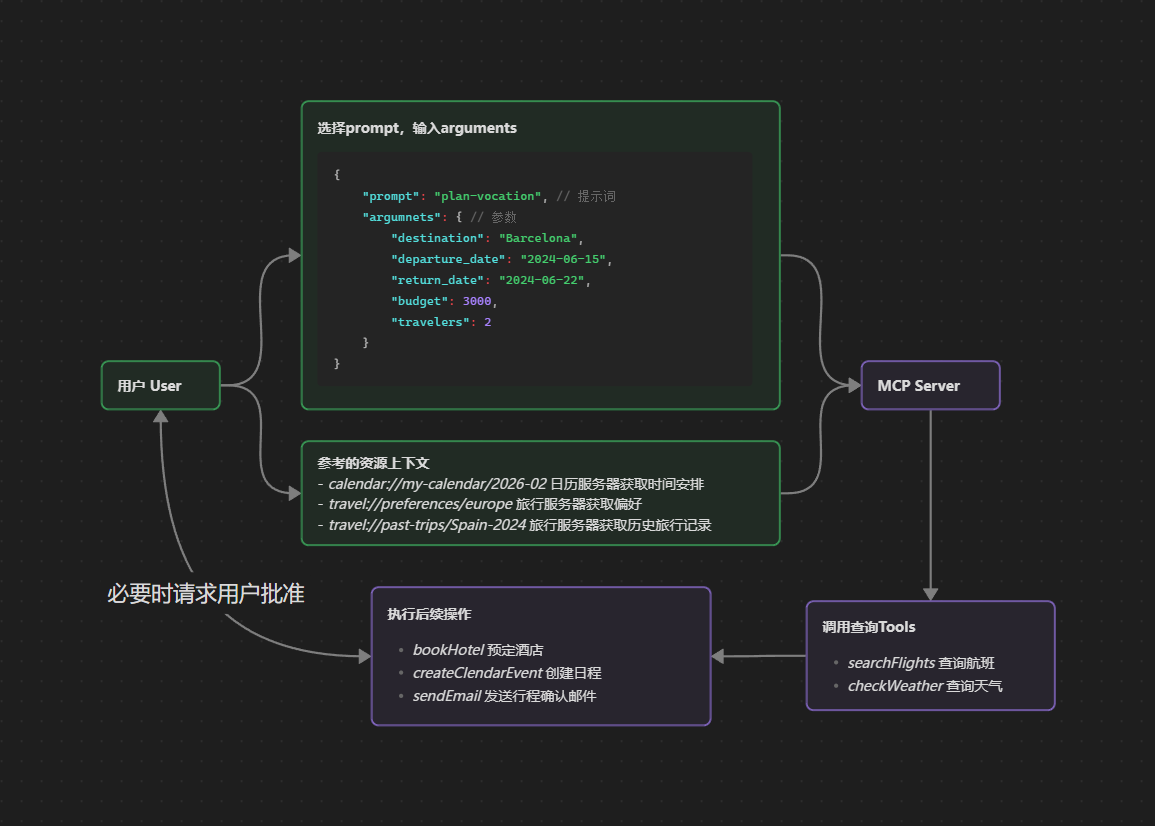
提示词 Prompts
Prompts定义
Prompts 允许 MCP Server Author 为特定领域提供参数化提示。
Prompts 如何工作:
定义了预期 Input 和交互模式的结构化模版
由 User Control ,需要显式调用而非自动触发
支持参数补全,以帮助用户发现有效的参数值
协议操作
prompts/list
prompts/get
定义示例
1 2 3 4 5 6 7 8 9 10 11
{ "name":"plan-vacation", "title":"Plan a vacation", "description":"Guide through vacation planning process", "arguments":[ {"name":"destination","type":"string","required":true}, {"name":"duration","type":"number","description":"days"}, {"name":"budget","type":"number","required":false}, {"name":"interests","type":"array","items":{"type":"string"}} ] }
asyncdefmake_nws_request(url: str) -> dict[str, Any] | None: """Make a request to the NWS API with proper error handling.""" headers = { "User-Agent": USER_AGENT, "Accept": "application/geo+json" } asyncwith httpx.AsyncClient() as client: try: response = await client.get(url, headers=headers, timeout=30.0) response.raise_for_status() return response.json() except Exception: returnNone
defformat_alert(feature: dict) -> str: """Format an alert feature into a readable string.""" props = feature["properties"] returnf""" Event: {props.get('event', 'Unknown')} Area: {props.get('areaDesc', 'Unknown')} Severity: {props.get('severity', 'Unknown')} Description: {props.get('description', 'No description available')} Instructions: {props.get('instruction', 'No specific instructions provided')} """
@mcp.tool() asyncdefget_alerts(state: str) -> str: """Get weather alerts for a US state. Args: state: Two-letter US state code (e.g. CA, NY) """ url = f"{NWS_API_BASE}/alerts/active/area/{state}" data = await make_nws_request(url)
ifnot data or"features"notin data: return"Unable to fetch alerts or no alerts found."
ifnot data["features"]: return"No active alerts for this state."
alerts = [format_alert(feature) for feature in data["features"]] return"\n---\n".join(alerts)
@mcp.tool() asyncdefget_forecast(latitude: float, longitude: float) -> str: """Get weather forecast for a location. Args: latitude: Latitude of the location longitude: Longitude of the location """ # First get the forecast grid endpoint points_url = f"{NWS_API_BASE}/points/{latitude},{longitude}" points_data = await make_nws_request(points_url)
ifnot points_data: return"Unable to fetch forecast data for this location."
# Get the forecast URL from the points response forecast_url = points_data["properties"]["forecast"] forecast_data = await make_nws_request(forecast_url)
ifnot forecast_data: return"Unable to fetch detailed forecast."
# Format the periods into a readable forecast periods = forecast_data["properties"]["periods"] forecasts = [] for period in periods[:5]: # Only show next 5 periods forecast = f""" {period['name']}: Temperature: {period['temperature']}°{period['temperatureUnit']} Wind: {period['windSpeed']}{period['windDirection']} Forecast: {period['detailedForecast']} """ forecasts.append(forecast)
return"\n---\n".join(forecasts) if __name__ == "__main__": # Initialize and run the server mcp.run(transport='stdio')